There are a lot of articles explaining how to replace the color palette in Gutenberg. But what if you need to add a color to the default color palette in Gutenberg? Not replace all colors, but add a color to the already existing colors?
To do this, you need to:
Let’s look into this in detail.
1. How to Get the Default Gutenberg Color Palette
Before adding colors to a color palette, you first need to get the color palette in your PHP code (unless you wish to replace all colors in the color palette completely, in which case please proceed to section 3).
You could try to use the function get_theme_support() to get the feature 'editor-color-palette' (see add_theme_support() for supported features) and get the color palette array from it like this:
$colorPalette = current( (array) get_theme_support( 'editor-color-palette' ) );
Unfortunately, this would work only if the parent theme called add_theme_support() explicitly. Otherwise, the line of code above will return boolean false.
But the default core color palette used in the Gutenberg block editor is stored in wp-includes/theme.json.
To get theme.json data, starting with WordPress 5.8.0, we can use an object of the class WP_Theme_JSON (located in wp-includes/class-wp-theme-json.php). To get an instance of this class, we can use WP_Theme_JSON_Resolver::get_core_data() (to get just the core data) or WP_Theme_JSON_Resolver::get_merged_data() (to get the core data merged with the theme data).
So the code to get the default core color palette could look like this:
// Get default core color palette from wp-includes/theme.json
$colorPalette = [];
if (class_exists('WP_Theme_JSON_Resolver')) {
    $settings = WP_Theme_JSON_Resolver::get_core_data()->get_settings();
    if (isset($settings['color']['palette']['core'])) {
        $colorPalette = $settings['color']['palette']['core'];
    }
}
This code could be used e.g. in the filter ‘after_setup_theme‘ as described here.
Please notice: the variable $colorPalette will contain entries with color names already translated to your default language.
You can check in the debugger that $colorPalette really contains the translated color names. First, you need to change the language:
Changing the language of the whole site:
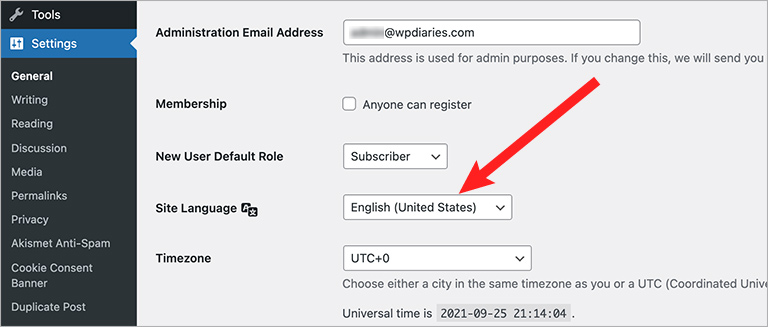
- In the WordPress admin panel go to
Settings > General - Select a different language from the drop-down list Site Language
- Click the button Save Changes
- You may be asked by WordPress to update the translations in the Dashboard > Updates section if the translations for this language have not been installed yet
Changing only the admin panel language for a particular user:
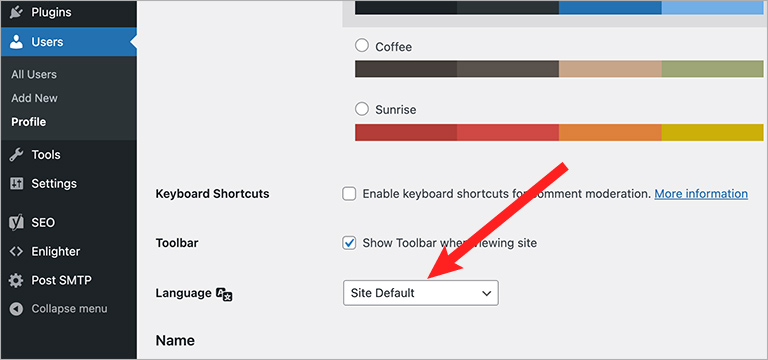
- In the WordPress admin panel go to Users
- Click on the user in the list on the right
- Choose a language for the user in the Language drop-down list.
This drop-down list is shown only if you’ve added at least 1 additional language to your site (see right above how to do that) - Click the button Update Profile
Now you can check the variable $colorPalette in the debugger. For this, you need to configure XDebug in your development environment and configure your IDE. Please see this article for an example of using XDebug with a WordPress Docker container and an explanation of how to configure the debugger in PhpStorm.
Also, if you do not know how to set up your local development environment, the article on how to set up your local development environment using VirtualBox could be useful for you.
In the next section, where we would be adding new colors to the WordPress core color palette, you would be able to see the translated core color names by just hovering the mouse over a color in the color dialog in Gutenberg.
2. How to Add Colors to the Default Core Color Palette
If your intention is not to add colors to the default palette, but to replace all colors in the palette, please proceed to section 3.
Initially, your default core color palette could look like this:
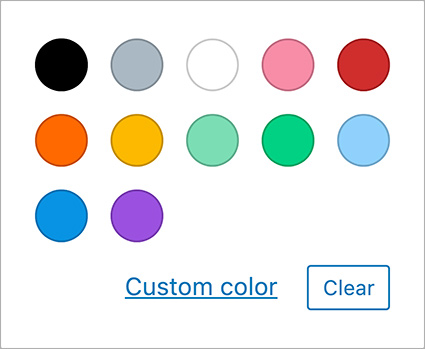
This is the dialog that shows if you are trying to set a foreground color to some text in Gutenberg.
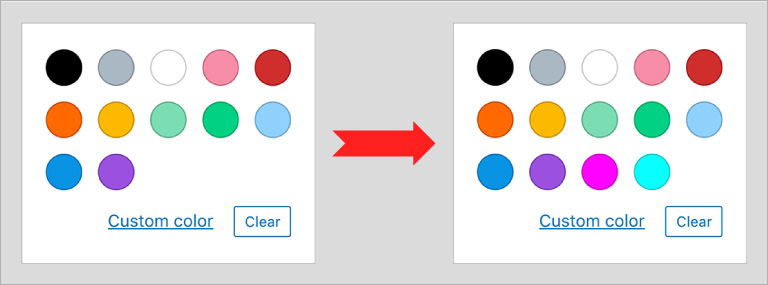
Let’s add 2 primary colors of the CMYK color space to this palette: magenta (#ff00ff) and cyan (#00ffff). As a result, we want the color selection dialog to look like this:
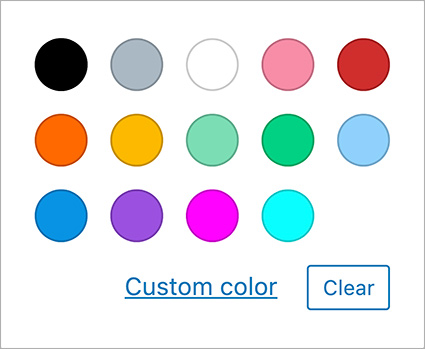
You see that in this dialog our 2 new colors (magenta #ff00ff and cyan #00ffff) are added at the end.
Let’s add the colors:
We’ll use the function add_theme_support() inside the filter ‘after_setup_theme’. Also, we’ll use the code from section 1 to get the original color palette:
function my_theme_add_new_features() {

    // Try to get the current theme default color palette
    $oldColorPalette = current( (array) get_theme_support( 'editor-color-palette' ) );

    // Get default core color palette from wp-includes/theme.json
    if (false === $oldColorPalette && class_exists('WP_Theme_JSON_Resolver')) {
        $settings = WP_Theme_JSON_Resolver::get_core_data()->get_settings();
        if (isset($settings['color']['palette']['default'])) {
            $oldColorPalette = $settings['color']['palette']['default']; // there is no need to apply translations to color names - they are translated already
        }
    }

    // The new colors we are going to add
    $newColorPalette = [
        [
            'name' => esc_attr__('Magenta', 'myThemeLangDomain'),
            'slug' => 'magenta',
            'color' => '#ff00ff',
        ],
        [
            'name' => esc_attr__('Cyan', 'myThemeLangDomain'),
            'slug' => 'cyan',
            'color' => '#00ffff',
        ],
    ];

    // Merge the old and new color palettes
    if (!empty($oldColorPalette)) {
        $newColorPalette = array_merge($oldColorPalette, $newColorPalette);
    }

    // Apply the color palette containing the original colors and 2 new colors:
    add_theme_support( 'editor-color-palette', $newColorPalette);
}
add_action( 'after_setup_theme', 'my_theme_add_new_features' );
Please notice: This works in WordPress 6.0. But in some previous versions, the default core color palette was stored in $settings['color']['palette']['core'] rather than $settings['color']['palette']['default'] in the code above.
Please also see the WordPress documentation for Theme Support.
Now we need to add CSS styles for the newly added colors both to the front end and to the admin panel as described in the WordPress documentation:
.has-magenta-background-color {
    background-color: #ff00ff;
}
.has-magenta-color {
    color: #ff00ff;
}
.has-cyan-background-color {
    background-color: #00ffff;
}
.has-cyan-color {
    color: #00ffff;
}
– If you are adding colors in the Site-Specific Plugin, then enqueue the styles both in the hook wp_enqueue_scripts (for the front end) and in admin_enqueue_scripts (for the admin panel).
The code could look like this (here we are using a trick from comments on the documentation page wp_enqueue_script to bypass the browser cash):
function site_specific_plugin_load_scripts() {
    // Trick from https://developer.wordpress.org/reference/functions/wp_enqueue_script/
    $my_css_ver = date("ymd-Gis", filemtime( plugin_dir_path( __FILE__ ) . 'assets/css/site.css' ));

    wp_register_style('site_specific_plugin_css', plugins_url('assets/css/site.css', __FILE__), false, $my_css_ver);
    wp_enqueue_style('site_specific_plugin_css');
}

add_action('wp_enqueue_scripts', 'site_specific_plugin_load_scripts'); // for the front end
add_action('admin_enqueue_scripts', 'site_specific_plugin_load_scripts'); // for the admin panel
– If you are adding colors in the child theme (rather than in a plugin), the PHP code needs to be added to the theme functions.php. And the CSS styles need to be added:
- for the frontend: to the theme CSS file (usually it is style.css)
- for the admin panel: you need to check if some CSS file is already enqueued on the hook admin_enqueue_scripts. If it is, you could add the styles to that CSS file.
If such a CSS file for the admin panel does not exist, you could enqueue your own CSS file infunctions.phplike this:
function my_theme_load_scripts() {
    // Trick from https://developer.wordpress.org/reference/functions/wp_enqueue_script/
    $my_css_ver = date("ymd-Gis", filemtime( plugin_dir_path( __FILE__ ) . 'assets/css/site.css' ));
    wp_register_style('admin_panel_css', get_stylesheet_directory_uri() . '/assets/css/editor-style.css', false, $my_css_ver);
    wp_enqueue_style('admin_panel_css');
}
add_action('admin_enqueue_scripts', 'my_theme_load_scripts'); // for the admin panel
After this, you should see our 2 new colors added to the WordPress default core color palette.
Of course, with WordPress 5.8.0 (also see release notes for 5.8.1) you can just add the file theme.json to your WordPress theme (please see section 3.1). This file has precedence over add_theme_support(). And you can redefine your color palette in this file (these colors will replace the existing colors, not been added to them).
Still, sometimes it could be convenient to add extra colors programmatically. E.g. in a Site-Specific Plugin (your own plugin which you can add to all your sites and where you could add some general for all your sites features).
3. How to Replace a Color Palette
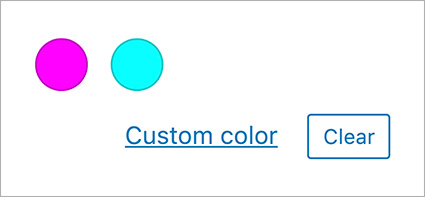
In this section we’ll consider a simpler task: we’ll replace the WordPress color palette with a color palette containing just 2 colors. For this example, we will use the same colors as in the previous sections: 2 primary colors of the CMYK color space: magenta (#ff00ff) and cyan (#00ffff).
And, as a result, we want the color selection dialog to look like this:
3.1 Replace Color Palette Using theme.json
Again, if your intention is to replace colors on your site rather than add colors to the existing color palette, starting with WordPress 5.8.0, the simplest way is to add the file theme.json to your theme root folder. And define your color palette there.
E.g. to replace the existing color palette with magenta (#ff00ff) and cyan (#00ffff), we could add this file theme.json to the root folder of our theme:
{
    "version": 1,
    "settings": {
        "color": {
            "palette": [
                {
                    "name": "Magenta",
                    "slug": "magenta",
                    "color": "#ff00ff"
                },
                {
                    "name": "Cyan",
                    "slug": "cyan",
                    "color": "#00ffff"
                }
            ]
        }
    }
}
This is enough to replace the existing color palette with the color palette containing just 2 colors (Magenta #ff00ff and Cyan #00ffff).
Please notice:
- If you defined some setting in the file theme.json, it will take precedence over the same setting defined by the function add_theme_support().
- If you use the
theme.jsonshown right above, many of your editor settings will change. E.g. the text in the Gutenberg editor will become all screen-wide instead of being in the column in the middle of your screen, the font will change, etc. So, if you addtheme.json, you need to define such settings explicitly. E.g. here we have more Gutenberg settings defined:
{
    "version": 1,
    "settings": {
        "layout": {
            "contentSize": "800px",
            "wideSize": "1000px"
        },
        "color": {
            "palette": [
                {
                    "name": "Magenta",
                    "slug": "magenta",
                    "color": "#ff00ff"
                },
                {
                    "name": "Cyan",
                    "slug": "cyan",
                    "color": "#00ffff"
                }
            ]
        }
    }
}
You can read more about these settings in the theme.json settings documentation.
If you think that trying to redefine all previously existent settings (which have vanished after you’ve added theme.json) is too much trouble, section 3.2 shows how to replace the color palette programmatically.
3.2 Replace Color Palette Programmatically
The programmatic way of replacing the color palette is more old-fashioned. Still, it could be useful sometimes. E.g. if you need to replace your color palette by adding code to your Site-Specific Plugin.
This is easy. Instead of merging the color palettes (like in section 2), you just redefine the color palette right away. So, the PHP code from section 2 would look like this instead:
function my_theme_add_new_features() {

    // The new colors we are going to add
    $newColorPalette = [
        [
            'name' => esc_attr__('Magenta', 'default'),
            'slug' => 'magenta',
            'color' => '#ff00ff',
        ],
        [
            'name' => esc_attr__('Cyan', 'default'),
            'slug' => 'cyan',
            'color' => '#00ffff',
        ],
    ];

    // Apply the color palette containing the original colors and 2 new colors:
    add_theme_support( 'editor-color-palette', $newColorPalette);
}
add_action( 'after_setup_theme', 'my_theme_add_new_features' );
You would need to add this PHP code to your functions.php or your plugin in the same way as in section 2.
The CSS code would be the same as in section 2:
.has-magenta-background-color {
    background-color: #ff00ff;
}
.has-magenta-color {
    color: #ff00ff;
}
.has-cyan-background-color {
    background-color: #00ffff;
}
.has-cyan-color {
    color: #00ffff;
}
The CSS file should be enqueued exactly as in section 2.
After this, the default color palette would be replaced with a color palette containing our 2 colors only: magenta (#ff00ff) and cyan (#00ffff).
Conclusion
I hope you’ve liked the article.
It would be really great to hear from you now. If you have any thoughts or ideas, I would be really glad if you posted them in the comment section below.
![[Docker] How to Set up Postfix Containers and Send Emails From WordPress in Docker](https://www.wpdiaries.com/wp-content/uploads/2020/07/smtp-150x150.jpg)
![[VirtualBox] Configure an Ubuntu 22.04 / 20.04 Virtual Machine for Web Development (Complete Guide)](https://www.wpdiaries.com/wp-content/uploads/2020/09/local-development-environment-150x150.jpg)


This worked like a charm. Thanks a bunch!
I am very glad to hear this. Thanks for letting me know!